Room Setup for Recording
Room Setup for Recording
Room Setup for Recording
Overview
Studio acoustics will make have a real effect on your recordings. You must ensure that there is no reverberation of sound off the walls, floors, ceilings or other surfaces and that there is no external noise that can filter in and affect your recordings.
Things to consider
If you are using a home studio there is lots of advice available on the Internet on how to setup your room.
Below are twelve important factors ZOO Digital recommends focusing on:
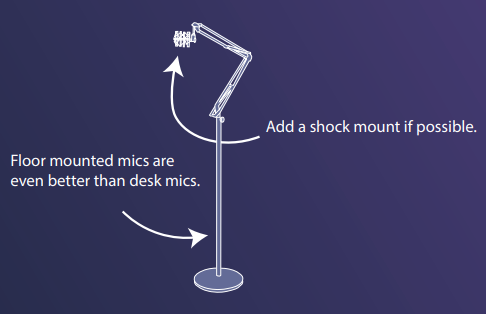
Use a floor mounted mic stand with a shock mount if possible.
If your mic is sat on your desk, keep your computer off the desk so that vibrations aren’t transferred through.
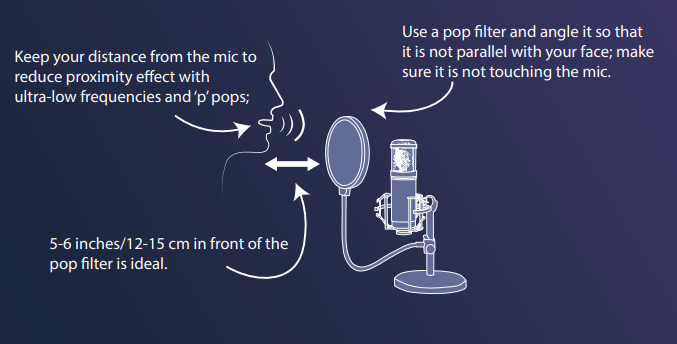
Use a pop filter and angle it so that it is not parallel with your face; make sure it is not touching the mic.
Use headphones to listen to the audio rather than playing it through speakers.
Keep your distance from the mic to reduce proximity effect with ultra-low frequencies and ‘p’ pops; 5-6 inches/12-15 cm in front of the pop filter is ideal.
Try and seal the room from external sound.
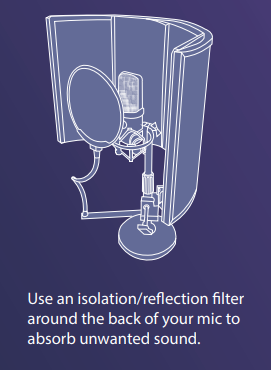
Use an isolation/reflection filter around the back of your mic to absorb unwanted sound.
Consider building or buying a portable sound booth if you don’t have the space for a dedicated room.
Use blankets, cushions, soft furnishings, basically anything you can to deaden the sound.
If you are using a laptop, consider purchasing a laptop cooling stand to keep it cool and reduce fan noise.
If you are not using a laptop, try and put your computer base unit in a different room so that the fans cannot be heard. Use extension cables to bring your screen and keyboard/mouse into the recording area.
Switch off the air conditioning.
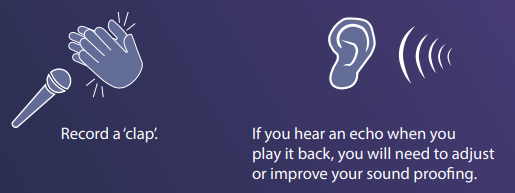
Tip - To test the steps above have worked:
![]() Last updated Feb. 28, 2022, 2:01 p.m. by Duncan Muggleton
Last updated Feb. 28, 2022, 2:01 p.m. by Duncan Muggleton
ZOOdubs
- Approved Microphones for ZOOdubs
- Location Services
- Mac/OS - Microphone Sample Rate Setup
- Mac/OS - Microphone Settings and Levels/Gain
- Mac/OS - Required Machine Specs
- Microphone Permission Required Failed
- Recommended Internet Speed for ZOOdubs
- Room Setup for Recording
- Updating Google Chrome
- Windows 10 - Microphone Sample Rate Setup
- Windows 10 - Microphone Settings and Levels/Gain
- Windows 7 & 8 - Microphone Sample Rate Setup
- Windows 7 & 8 - Microphone Settings and Levels/Gain
- Windows 7/8 & 10 - Required Machine Specs